- Kyle Schultz
- Matt Dovenbarger
- March 17, 2021
- 9 Minute Read
Topics in This Article
What's the Deal with Grade I Insulation?
Insulation is a critical component of the thermal envelope and a major part of what keeps us comfortable in our homes! While R-Value and meeting building codes are important, the quality of the insulation install can have a huge impact on the overall performance of the home. Poorly installed insulation has a negative impact on the R-Value (thermal resistance) of your envelope.
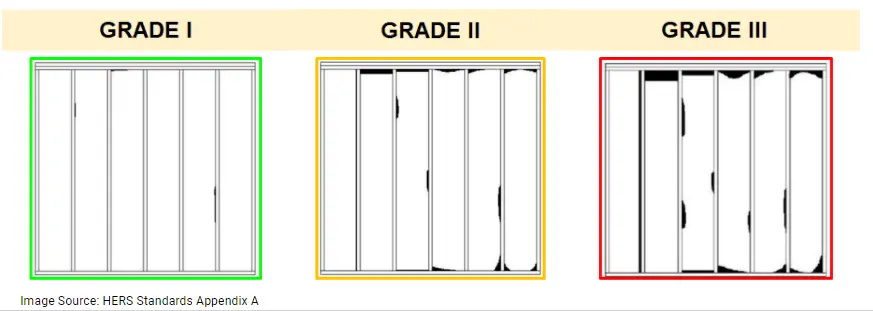
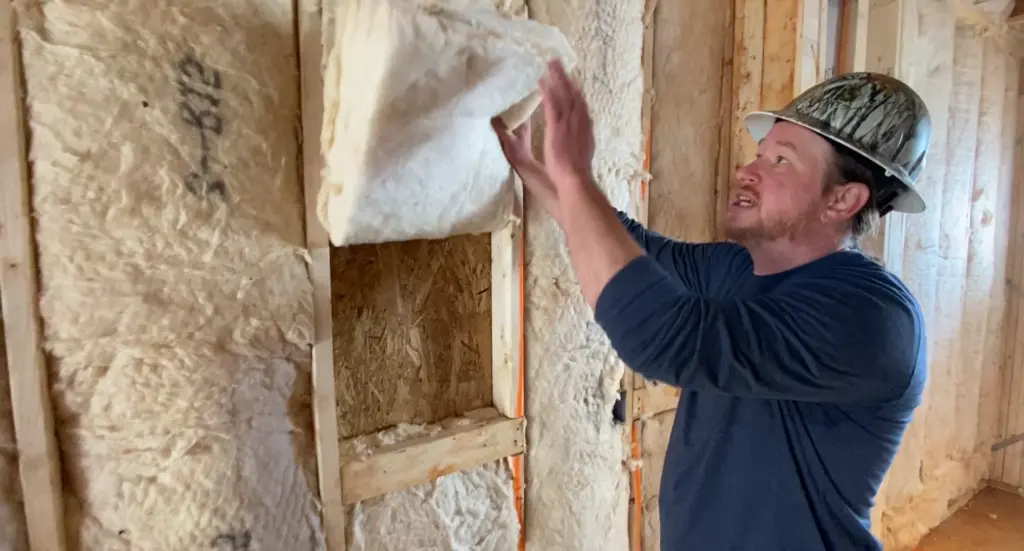
Although you may have satisfied code with a Grade II or III install, there’s still room for improvement. That’s where HERS Raters, like ourselves, come in. HERS Raters are trained and required to assign a grade to insulation based on the quality of installation — Grade l, ll, or lll — with Grade I being the best, Grade ll being average, and Grade lll being the worst. Check out Matt’s quick tips for how to achieve Grade I insulation below and keep scrolling for a deeper dive on benefits and what to watch out for.
What is Grade I Insulation?
The Residential Energy Services Network (RESNET) defines Grade l insulation as:
“Minor Defects- Occasional very small gaps are allowed. Voids can’t extend from the interior to the exterior (i.e. the full width of a wall cavity). The product is installed according to manufacturer’s specification and cut to fit around electrical junction boxes and is split around wires and pipes. Compression or incomplete fill amounting to 2% or less, if the empty spaces are less than 30% of the intended fill thickness, are acceptable for Grade I.”

Every home we inspect is assigned an insulation grade. While you would think that Grade l should be the norm, you’d be surprised at how often we see Grade ll & lll in the field. We would consider improving to Grade l as “low hanging fruit” and a one of the most cost effective strategies for improving your home’s performance. Check out our blog “5 low cost construction techniques to build more efficient homes” for more hot tips!
Builder Benefits & Homeowner Impact of Grade I Insulation?
The quality of your insulation installation is one of THE most important parts of delivering a comfortable home. It’s also one of the most overlooked details. But why is it so commonly missed? There’s several reasons this can happen such as: a lack of code enforcement, education/training among the trade base and builders, lack of clear expectations, lack of accountability, turnover in insulation crews, and scheduling pressures to get the job done quicker.
Here are some builder benefits of consistent Grade l insulation:
- Reduce comfort callbacks & warranty claims
- Protect your reputation
- Gain control over your homes’ performance
- Increased utility rebates
- Better HERS scores
- Delivering a better product with happier customers
Homeowner benefits are also notable (queue your marketing department!):
- Peace of mind
- Reduced utility cost for heating & cooling
- Quality & comfort

Comfort
This is likely the biggest impact. Although we can’t quantify comfort, defects in insulation cause hot & cold spots in your envelope (which can lead to potential moisture pockets and comfort callbacks).

HERS Score Penalty
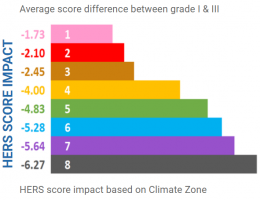
Going from Grade l insulation to Grade lll negatively affects your HERS score (and increases utility cost for homeowners). This can range from 2-4 points, or worse, in Climate Zones 3 & 4.

Program Requirements
Many high-performance programs require Grade I insulation, including ENERGY STAR, DOE Zero Energy Ready, LEED for homes, NGBS and Passive House.

Utility Rebates
Grade l insulation is critical for utility rebates such as Duke Energy’s HERO Code. It can be the difference between passing and failing, while you could also risk losing your rebate entirely. Bonus points: Grade 1 insulation can increase your rebate amount.

You're Not Getting What You Paid For
If your insulator’s scope of work includes installation per manufacturer’s recommendations, Grade I should technically be implemented. Set clear expectations and let us hold your trades accountable!
Field Examples and a Guide to Achieving Grade I Insulation
Now that we’ve established what Grade l insulation is and why it’s important, let’s look at some examples from the field. Use this as your guide to achieve Grade l insulation!
Quick Guide:
- Avoid compression more than 3/4″
- Split your batts around wires and electric boxes
- Insulate all the way to the exterior of your 2 stud corners
- Insulate behind your ladder blocking
- Cut batts to fit window & door headers
- Fill cavities and avoid voids
- Make sure blown insulation stays fluffy!
Split Your Fiberglass Batts
Batts should be split around obstructions in the wall cavities (electrical, plumbing, termite lines, etc.).
The pictures above are too common. Compressed batts that are not split around obstructions in the wall cavities create hot & cold air pockets in your building envelope & you don’t get the full R-Value out of your insulation (not good).
Fluff It, DON'T Stuff It!
This old school phrase says it all! Avoid compressions and cut the batts to fit the cavity. Compressed batts reduce the R-Value/thermal resistance, meaning the insulation is not performing to its full potential. Don’t forget to cut around receptacles, don’t just stuff it!
Cali Corners
It might be hard to tell, but the first image shows a FG batt stuffed into a California Corner. This creates compressions, which are not good. The right shows a separate piece cut to fit the corner, this is good!
Ladder T Blocking at Interior/Exterior Wall Intersections
This is another one where it might be hard to tell what’s going on. The left picture shows a FG batt stuffed behind a Ladder T intersection. This creates compressions, which are not good. The right shows a separate piece cut to fit behind the Ladder T intersection.
Window and Door Headers
Insulation is commonly stuffed into window headers haphazardly. Cut a piece to fit the headers and remember– FLUFF it, don’t stuff it.
FILL the Entire Cavity (No Voids)
Voids in your insulation can lead to thermal images that look like this- no bueno!
Uniform Blown Attic Insulation
The first picture is a perfect example of when trades do work in the attic towards the CO stage, disturbing areas of the blown insulation. Fluff it up afterwards and keep that insulation uniform!
Don’t forget to pay attention to your wind baffles! Wind baffles should extend over the exterior edge of the top plate so insulation can sit over the top plate.
What's Next?
Hopefully you’ve taken away a few tips on how to achieve Grade l Insulation and why it’s important. If you’re interested in improving the quality of your insulation installs, our advice to builders is to set clear expectations with your insulators. Partnering with a HERS Rater can be valuable for quality assurance and holding your trades accountable. We are your extra set of eyes in the field! If your insulation doesn’t look up to Grade I standard, we’re happy to host a training session with your insulation crews to get things back on track. Comfortable homes mean happy customers, and we’re here to help!
Ready to Get Started?
Schedule a meeting with us today to review your home performance goals and challenges.
About Us
North Carolina’s solar power and building performance expert. Founded in 2001, we’ve worked for 20+ years to improve the way people make and use energy.
© 2023 Southern Energy Management, Inc.


